

 3D Engine 3 - Direct-X and .3DS format
Hi people !
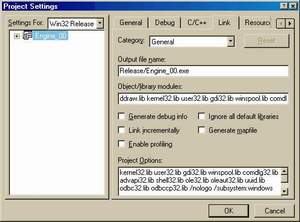
Today i promised to tell you something about 3d-studio and DirectX. We will go over directs at first. You will need module for work with DirectX. It runs with directx 3.0 and better. (in next parts of serial i'm using dx7 - version of this module, but i keep this 3.0 for people working on old computers ...) To add this module into your project it's necessary to copy both files Directx.cpp and Directx.h into project directory, add them into the project and then in menu Project >> Settings (Visual C ++ 6.0) under Link bookmark simply add text "ddraw.lib" into field Object / library modules (maybe you'll have to go to downloads section and download libraries for directX7 (works well with this module and in fact require directx 3 only)) :
Today i promised to tell you something about 3d-studio and DirectX. We will go over directs at first. You will need module for work with DirectX. It runs with directx 3.0 and better. (in next parts of serial i'm using dx7 - version of this module, but i keep this 3.0 for people working on old computers ...) To add this module into your project it's necessary to copy both files Directx.cpp and Directx.h into project directory, add them into the project and then in menu Project >> Settings (Visual C ++ 6.0) under Link bookmark simply add text "ddraw.lib" into field Object / library modules (maybe you'll have to go to downloads section and download libraries for directX7 (works well with this module and in fact require directx 3 only)) :
And of course you'll have to add this line : #include "directx.h" somewhere into
file where you want to use it.
There are plenty of functions in this module :
InitDirectX
TerminateDirctX
InitVideoBuffer
FlipVideoBuffer
err_to_string
See, it didn't even pain ... It shouldn't be hard now to convert our simple engine to directx, see it pretty in fullscreen and get rid of blinking when redrawing ... For those who don't use MSVC: __int32 type is simply 32-bit long so replace it. Just a little sample how to use it :
DirectX example
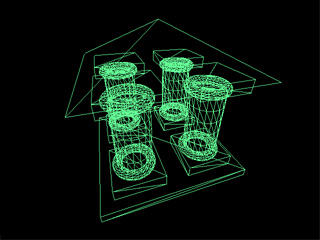
It's really simple. Just create window, go fullscreen - and wait for escape to quit. Yes, readers who are paying attention noticed nothing is drawn. But the better pieces are on their way ... Let's get to 3d-studio. You can download 3ds_loader module (thanks to author of page www.the-labs.com for nice table of 3DS tags), inside there are two files again - load_3ds.cpp and load_3ds.h. Again add to project and include header. When you open it, you'll see this :
We have some structures Plane is plane, defined by it's prependicular (= normal) vector and distance from origin along that vector. Vector is vector in 3-space. Vertex is our vertex with position and u, v coordinates, telling us position of texture in that vertex. We aren't interested in it now. Next our well known matrix, Material - structure, describing texture, Light - light with it's id, name, position, color and a few next properties, but we will be interested in lights in long long time. Next is Face - mainly three pointers to it's vertices, material and plane it's lying on. Object is just list of faces and their vertices + some animating stuff. Camera is camera, for now just it's matrix and finally the World structure connects it all togather. The function loads world from file, that should be obvious ... Now we could write our wire-frame spinning box (or more likely potato). To make it really cool we include Backface culling i'm reminding you again and again. But how does that work ? You should already know the plane equation :
A * x + B * y + C * z + D = 0
Where A, B and C are coordinates of normal vector (vector, prependicular to that plane), and D is distance from origin O (O = [0 0 0]) along that vector.
You can compute common plane from three points, lying on that using cross product :
A bit explaining ... Plane is plane, given by its normal vector [a b c] and prependicular distance from origin d. Vector is 3-space vector. _Len is length of vector. _Normalize makes vector to be unit (direction is the same, but the length is 1). And eventually _Cross computes cross-product, ie. vector w will be prependicular to both vectors u and v. (u and v lies in our plane, they mustn't be parallel !) It should be clear now.
Well - back to our plane equation : x, y and z are point coordinates. The equation is truth - this point lies on the plane. But also if the result is positive, the point is lying in front of plane, negative - behind the plane. So you can tell where the point is relatively to plane. Did it hit you already ? We can tell when our camera is lying in front of face to see it ! There is simple trick that doesn't require to transform the plane. You simply invert transformation matrix and it's position will be eye position in objectspace. You can tell that matrix inversion costs more CPU time than plane transformation, but you inverse one matrix per object or one plane per face (and object will be certainly more than one face) Let's see the code :
You may notice i'm no longer checking for off-screen vertices. When you work with faces, it's done quite another way. You put every face trough the clipping pyramid (that's quad of planes, forming field of view ;-)) And when the face is only partialy visible it gets cut to polygon. (or completely discarded when not visible) So i'm not checking for offscreen points, because there won't be such. I'll put here simple image for better imagination
|
InitDirectX
Quite self-explanatory. Just pass window handle and desired resolution ...
|
TerminateDirctX
Terminates directx context.
|
InitVideoBuffer
Returns true when success, returns pointer where you can copy images ...
|
FlipVideoBuffer
Flips buffers and displays results of your drawing.
|
err_to_string
Translates errors to strings ... czech :-( but we won't need that.
|
See, it didn't even pain ... It shouldn't be hard now to convert our simple engine to directx, see it pretty in fullscreen and get rid of blinking when redrawing ... For those who don't use MSVC: __int32 type is simply 32-bit long so replace it. Just a little sample how to use it :
|
It's really simple. Just create window, go fullscreen - and wait for escape to quit. Yes, readers who are paying attention noticed nothing is drawn. But the better pieces are on their way ... Let's get to 3d-studio. You can download 3ds_loader module (thanks to author of page www.the-labs.com for nice table of 3DS tags), inside there are two files again - load_3ds.cpp and load_3ds.h. Again add to project and include header. When you open it, you'll see this :
|
We have some structures Plane is plane, defined by it's prependicular (= normal) vector and distance from origin along that vector. Vector is vector in 3-space. Vertex is our vertex with position and u, v coordinates, telling us position of texture in that vertex. We aren't interested in it now. Next our well known matrix, Material - structure, describing texture, Light - light with it's id, name, position, color and a few next properties, but we will be interested in lights in long long time. Next is Face - mainly three pointers to it's vertices, material and plane it's lying on. Object is just list of faces and their vertices + some animating stuff. Camera is camera, for now just it's matrix and finally the World structure connects it all togather. The function loads world from file, that should be obvious ... Now we could write our wire-frame spinning box (or more likely potato). To make it really cool we include Backface culling i'm reminding you again and again. But how does that work ? You should already know the plane equation :
A * x + B * y + C * z + D = 0
Where A, B and C are coordinates of normal vector (vector, prependicular to that plane), and D is distance from origin O (O = [0 0 0]) along that vector.
You can compute common plane from three points, lying on that using cross product :
|
A bit explaining ... Plane is plane, given by its normal vector [a b c] and prependicular distance from origin d. Vector is 3-space vector. _Len is length of vector. _Normalize makes vector to be unit (direction is the same, but the length is 1). And eventually _Cross computes cross-product, ie. vector w will be prependicular to both vectors u and v. (u and v lies in our plane, they mustn't be parallel !) It should be clear now.
Well - back to our plane equation : x, y and z are point coordinates. The equation is truth - this point lies on the plane. But also if the result is positive, the point is lying in front of plane, negative - behind the plane. So you can tell where the point is relatively to plane. Did it hit you already ? We can tell when our camera is lying in front of face to see it ! There is simple trick that doesn't require to transform the plane. You simply invert transformation matrix and it's position will be eye position in objectspace. You can tell that matrix inversion costs more CPU time than plane transformation, but you inverse one matrix per object or one plane per face (and object will be certainly more than one face) Let's see the code :
|
You may notice i'm no longer checking for off-screen vertices. When you work with faces, it's done quite another way. You put every face trough the clipping pyramid (that's quad of planes, forming field of view ;-)) And when the face is only partialy visible it gets cut to polygon. (or completely discarded when not visible) So i'm not checking for offscreen points, because there won't be such. I'll put here simple image for better imagination
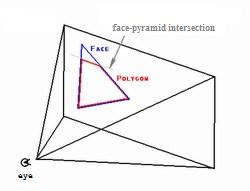
Polygon, made by cutting face by pyramid can have maximally seven vertices. Can someone of
you send me that image ? (just for excercise, of course i know it !)
We just need contents of DrawPolygon(); It will simpl draw three lines. How to draw line ?
Simplest and possibly fastest way to do it is Brensham's algorithm :
And we are complete ! I will stop torturing your mind with these terrible 3-space imaginations, you can download your example :
|
And we are complete ! I will stop torturing your mind with these terrible 3-space imaginations, you can download your example :
Valid HTML 4.01