

 3D Engine 8 - mip-mapping and texture filtering
Hi ! I'm back again ... today i'll talk a bit about texture filtering and mip-mapping.
Let's move on !
What the Mip-Mapping is ?
What the Mip-Mapping is ?
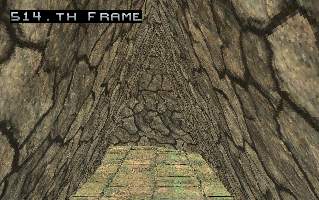
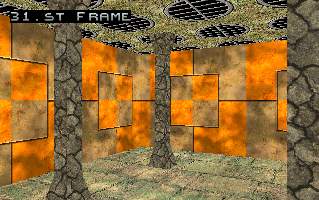
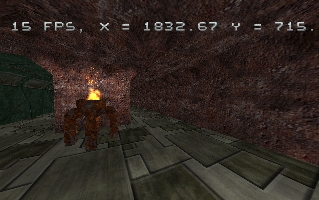
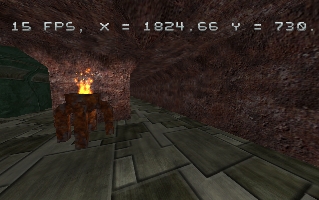
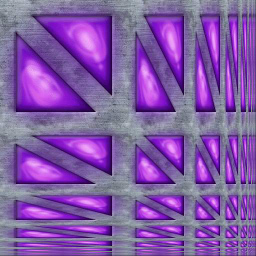
Look at these beautiful images ! They are both from the previous part and there is something
similar in each of them - they contain surfaces where detail of the texture is quite larger
than the screen resolution. In the left one these are for example far walls or floor, on the
second one it's floor again and ceiling.
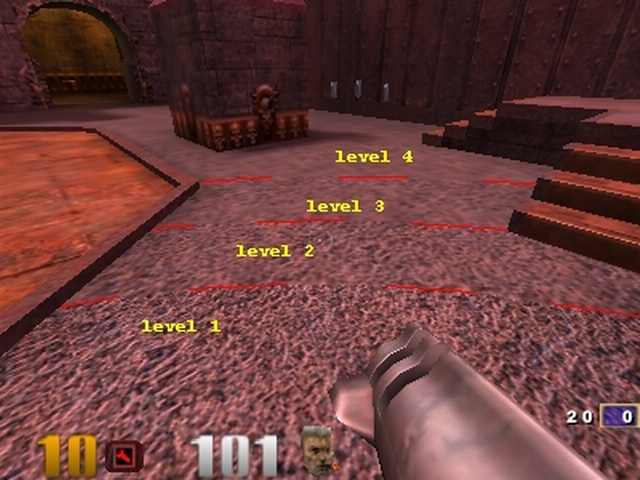
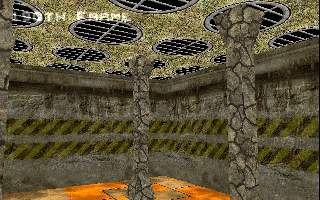
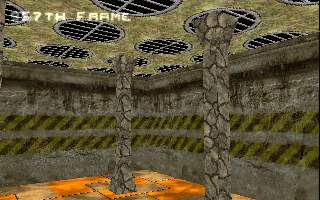
When you draw a static image, it looks bad, but it's still allright. But if it's animation or game, it's terrible : when you move, all textures are rushing and blinking ... How to prevent that ? Look at these screenshots from quake (I) :
When you draw a static image, it looks bad, but it's still allright. But if it's animation or game, it's terrible : when you move, all textures are rushing and blinking ... How to prevent that ? Look at these screenshots from quake (I) :
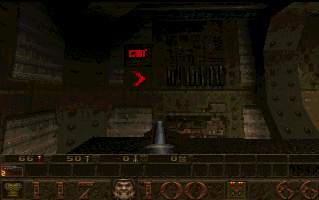
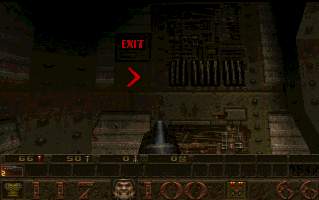
Look at the "Exit" sign. On the left image, camera is more far off the wall than on the
right one - so the left sign has a texture with less detail. On the right image player is
a bit nearer and the texture switches to version with more detail. It's the very basic
function of mip-mapping. It's important to create lower-detail textures with some good
scaling routine (or some gfx program like Photoshop / etc ...) I'll put here one more
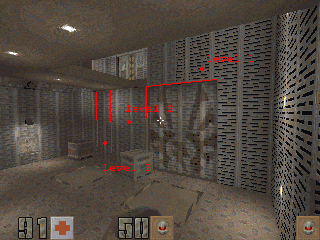
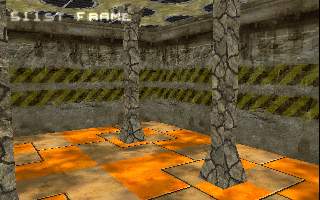
example. It's my old game, source is availbale in download section. There's no mip-mapping
at the top image :
(notice the far passages or wall behind the light ...)
Mip-Mapping in practice
There are two versions of mip-mapping : ordinary (i think most of games / rendering engines) nad bi-directional. Ordinary means texture is scaled in both directions with the same coefficient. Bi-directional will have mipmaps of all possible power-of-two sizes up to original texture sizes (ie. separate scaling coefficients for texture's width and height).
Another division could be per-polygon and per-scanline. Per-polygon means that whole polygon will be textured using single mip-map (ie. one scaled down version of texture). Per-scanline means that each scanline can have another mip-map when necessary. Mip-mapping per scanline has one modification, implemented in hardware - for each vertex the corresponding texel size is computed and then interpolated across whole surface, serving as mip-map level selector. You can see it in all HW-accelerated gamse :
There is one more improvement, called trilinear filtering - texel size value isn't used for deciding
which mip-map level to use, but to precisely mix between two nearest levels - so you can't see the
"step" as on the image above (marked with red lines).
We will use per-poly mipmapping as it's the most simple to implement. When doing that it's recomended to subdivide polygons. Consider situation with two rooms, each one have one-polygon floor. When standing in one, looking to the other, the level of detail for mipmap in first room will be quite different to second room so you will see significant change in texture quality in place floor polygons are meeting.
Most of games uses BSP-trees that can do subdivision for us, like in Quake 2 (can't find another game that would use per-polygon mip-mapping)
Mip-Mapping in practice
There are two versions of mip-mapping : ordinary (i think most of games / rendering engines) nad bi-directional. Ordinary means texture is scaled in both directions with the same coefficient. Bi-directional will have mipmaps of all possible power-of-two sizes up to original texture sizes (ie. separate scaling coefficients for texture's width and height).
Another division could be per-polygon and per-scanline. Per-polygon means that whole polygon will be textured using single mip-map (ie. one scaled down version of texture). Per-scanline means that each scanline can have another mip-map when necessary. Mip-mapping per scanline has one modification, implemented in hardware - for each vertex the corresponding texel size is computed and then interpolated across whole surface, serving as mip-map level selector. You can see it in all HW-accelerated gamse :
We will use per-poly mipmapping as it's the most simple to implement. When doing that it's recomended to subdivide polygons. Consider situation with two rooms, each one have one-polygon floor. When standing in one, looking to the other, the level of detail for mipmap in first room will be quite different to second room so you will see significant change in texture quality in place floor polygons are meeting.
Most of games uses BSP-trees that can do subdivision for us, like in Quake 2 (can't find another game that would use per-polygon mip-mapping)
Quake ][ takes advantage of it's BSP to simply divide polygons
Ordinary Mip-Mapping
As i told you above, mip-maps will have constant proportions. So for texture 64�64 pixels will be 32�32, 16�16, 8�8, 4�4, 2�2 and 1�1 mip-maps. Engine will switch between them. Whole thing will take 1 + 1/2 + 1/4 + 1/8 + 1/16 + 1/32 .. = 2 times more of memory than original texture. I don't exactly know how it's in non-power-of-two sized textures (new opengl implementation allows such ones) - maybe mipmaps are generated power-of-two or just half-size. I simply don't remember.
Bi-Directional Mip-Mapping
Bi-directional mip-mapping will use different proportions of original texture. It will look like this :
There's an original (128�128) texture in the upper left corner and all possible smaller textures are all arround.
You can see it will take four times more memory than original texture. (maybe that's why noone use that)
How to generate Mip-Maps ?
As i told you above, you should use some better resampling routine (search for bicubic / lanczos or like that ...) I've written a very simplified program (using no lanczos, just average every two pixels an you have half-sized image) Download it here. It's called from command-line and does support plenty of graphic formats (as far as i remember - bmp, pcx, tga, jpg, gif (when animated, put frames one below another)) The image in section "Bi-Directional Mip-Mapping" was generated using this ... I think you can do whatever you want with it (routines for loading images can be reused ...)
How to choose the right Mip-Map ?
Mip-level = level of mignification is given by texel size in particular place on screen. So - when texel (ie. pixel in texture just for case i didn't mention this yet) takes one or more pixels, nothing happens (i mean texel in original texture), but when it's smaller than half of pixel (in practice you will see two different texels, blinking in one pixel as you move) - it's time to switch to first mipmap. You will see slight twitch as texture change resolution, what you can solve by using trilinear filtering that will mix two nearest mipmaps - so no twitching. We won't do this sort of mipmapping since it requires two times more of CPU time (need to get texel from both mip-maps) + some time to mix resulting colour.
Let's talk a bit about texel size ! When you're interpolating a texture over your poly, you have some delta numbers. You could compute texel size using formula like this :
sqrt(dudx^2 + dudy^2) * sqrt(dvdx^2 + dvdy^2)
It's simply area of texel (in pixels). But in our case, there's a tiny lapse - we multiply our deltas with 1 / z so the result would be useless. (but this would be practical when doing trilinear filtering)
We will simply compute area of our polygon as it lies on screen and on texture (or to be more accurate - in screenspace & texturespace) - and by dividing these two values get - our texel size. Some c-code :
What does it do ? In first part it calculate polygon areas in screenspace and texturespace (adding more and more spaces, huh?) and simply calculate relative texel area. When too small, texel takes more than one screen pixels, when too large, it would result in noise since more texels would occupy single screen pixel. So next function tells us level of mip-map to use in order to display correctly. Where did i get those numbers ? Well, i spent afternoon flying over textured rectangle, adjusting these.
Example #1
How to generate Mip-Maps ?
As i told you above, you should use some better resampling routine (search for bicubic / lanczos or like that ...) I've written a very simplified program (using no lanczos, just average every two pixels an you have half-sized image) Download it here. It's called from command-line and does support plenty of graphic formats (as far as i remember - bmp, pcx, tga, jpg, gif (when animated, put frames one below another)) The image in section "Bi-Directional Mip-Mapping" was generated using this ... I think you can do whatever you want with it (routines for loading images can be reused ...)
How to choose the right Mip-Map ?
Mip-level = level of mignification is given by texel size in particular place on screen. So - when texel (ie. pixel in texture just for case i didn't mention this yet) takes one or more pixels, nothing happens (i mean texel in original texture), but when it's smaller than half of pixel (in practice you will see two different texels, blinking in one pixel as you move) - it's time to switch to first mipmap. You will see slight twitch as texture change resolution, what you can solve by using trilinear filtering that will mix two nearest mipmaps - so no twitching. We won't do this sort of mipmapping since it requires two times more of CPU time (need to get texel from both mip-maps) + some time to mix resulting colour.
Let's talk a bit about texel size ! When you're interpolating a texture over your poly, you have some delta numbers. You could compute texel size using formula like this :
sqrt(dudx^2 + dudy^2) * sqrt(dvdx^2 + dvdy^2)
It's simply area of texel (in pixels). But in our case, there's a tiny lapse - we multiply our deltas with 1 / z so the result would be useless. (but this would be practical when doing trilinear filtering)
We will simply compute area of our polygon as it lies on screen and on texture (or to be more accurate - in screenspace & texturespace) - and by dividing these two values get - our texel size. Some c-code :
|
What does it do ? In first part it calculate polygon areas in screenspace and texturespace (adding more and more spaces, huh?) and simply calculate relative texel area. When too small, texel takes more than one screen pixels, when too large, it would result in noise since more texels would occupy single screen pixel. So next function tells us level of mip-map to use in order to display correctly. Where did i get those numbers ? Well, i spent afternoon flying over textured rectangle, adjusting these.
Example #1
no Mip-Mapping
ordinary Mip-Mapping
and here Bi-Directional ...
These images are pretty stupid example and i'll have to replace it. Because we have per-polygon
mip-mapping and the quad with "fans" consist of two polygons, you can't see what really happens.
I'll have to replace these when less busy ...
Example is identic (excempt mip-maps) with recent s-buffer example here. I'd almost forget! There's also new font-engine, displaying bitmap fonts a-la Half-Life. Now the main part. In Raster.cpp we have a few more new lines:
It's mipmapping-method switch. Next some functions for calculating mip-map level:
This code compute texel area from delta values. As i said - we can't use our deltas because they're perspective correct so this function compute it's own ones. It's more like experiment, but it seems to work, a bit. Textures are in the same format our mip-map creator produce, it should be a bit more economical to compute mipmaps on-the-fly.
So much for mipmaps, now something on texture filtering.
Texture filtering
Since now, our engines had no filtering. Why ? Because of speed. But we have faster processors and can do something with it using bilinear filter:
Bilinear filtering
In classical texturing we used single pixel of texture, culling fractional part of it's coordinates. But we should put here a bit more care: we take fixed-point coordinate and extract integer and fractional part of it. Next we take four pixels (the one we'd use without filtering and three more, lying next texel - fractional parts are always positive) I'll add nice picture in order to explain it a bit more:
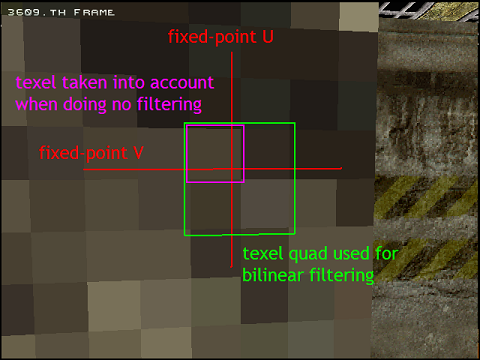
texture sampling
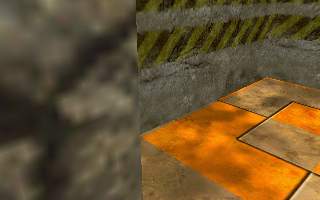
Bilinear filter
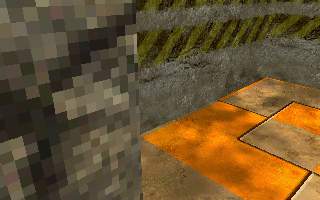
No filter
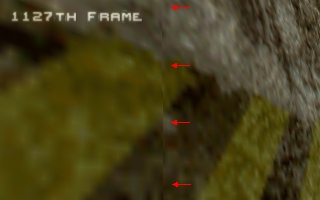
Bilinear filter (arrows mark error)
Example is identic (excempt mip-maps) with recent s-buffer example here. I'd almost forget! There's also new font-engine, displaying bitmap fonts a-la Half-Life. Now the main part. In Raster.cpp we have a few more new lines:
|
It's mipmapping-method switch. Next some functions for calculating mip-map level:
|
This code compute texel area from delta values. As i said - we can't use our deltas because they're perspective correct so this function compute it's own ones. It's more like experiment, but it seems to work, a bit. Textures are in the same format our mip-map creator produce, it should be a bit more economical to compute mipmaps on-the-fly.
So much for mipmaps, now something on texture filtering.
Texture filtering
Since now, our engines had no filtering. Why ? Because of speed. But we have faster processors and can do something with it using bilinear filter:
Bilinear filtering
In classical texturing we used single pixel of texture, culling fractional part of it's coordinates. But we should put here a bit more care: we take fixed-point coordinate and extract integer and fractional part of it. Next we take four pixels (the one we'd use without filtering and three more, lying next texel - fractional parts are always positive) I'll add nice picture in order to explain it a bit more:
texture sampling
Red lines are FP coordinates. Violet texel is texel we'd use with no filter (we used it since now)
and green lines mark pixel quad we're going to use. How ? We will need to calculate
weight factor for each of pixel (sum of weight factor is always one) and mix them together,
resulting in final pixel color. Can we optimalise it ?
We can precompute weight factors for u and v fractional values. They're stored in table, called "multab" in references. It contain four weight factor arrays (two-dimensional ones - we have u and v coordinate) We can compute weight-factors fairly simple:
It was simple as it always is. The only unexpected lines could be the only those with total. I won't have to decompose colors to rgb since i don't have to scale them. But i have to sum them. When they're all correctly scaled, maximal value of resulting r/g/b should never be larger than 255 so i neither need to handle r/g/b when adding colors. Take a look at texturing loop:
For each pixel we get integer index to texture (tex) and it's fractional part (frac), containing 12 bits (212 = 4096 = dimension of multab) - 6 bits of each coordinate fractional part (0000 VVVV VVUU UUUU). There are also some new constants : A_3 is texture pixel count - 1 (for 256x256 it's 0xffff). Next W_0 is width of texture (in order to get pixel at next texture scanline) and W_1 is W_0 + 1 to get next pixel without unnecessary adding. So we have all our indices, it's enough to get our weighting factors from multab. Now i can see i wrote it bad. I should've switched multab dimensions in order to take advantage of memory caching. Try it yourself and see if it's faster (you have to switch multab dimensions to [4096][4] and also all indirections to it) It will read first value of multab and in same read burst store three next to cache which is far faster than memory - it should be quite well visible speedup.
A reader who pay attention propably found error in this. Where ? In computing texel indices. We can't use index + 1 to get next pixel. In middle of texture, it's allright. But on the right edge we'll get pixel one step right, but also one step bottom! (this problem is for u only, v will compute allright) If you really wanted to do it right, you'd have to:
Meaning of W_0 remains the same, we won't need W_1 but it's gonna be a bit slower. Visual error of previous version is only poor visible jump at right border of texture so it's a bit better visible repetitivness of texture, but you really have to search for it, unless texture contain some contrast horizontal lines - then it's quite well visible. I'll use the faster version from now on.
How does it look then ? Nice, definitely !
We can precompute weight factors for u and v fractional values. They're stored in table, called "multab" in references. It contain four weight factor arrays (two-dimensional ones - we have u and v coordinate) We can compute weight-factors fairly simple:
- 1. Uf * Vf
- 2. (1 - Uf) * Vf
- 3. (1 - Uf) * (1 - Vf)
- 4. Uf * (1 - Vf)
|
It was simple as it always is. The only unexpected lines could be the only those with total. I won't have to decompose colors to rgb since i don't have to scale them. But i have to sum them. When they're all correctly scaled, maximal value of resulting r/g/b should never be larger than 255 so i neither need to handle r/g/b when adding colors. Take a look at texturing loop:
|
For each pixel we get integer index to texture (tex) and it's fractional part (frac), containing 12 bits (212 = 4096 = dimension of multab) - 6 bits of each coordinate fractional part (0000 VVVV VVUU UUUU). There are also some new constants : A_3 is texture pixel count - 1 (for 256x256 it's 0xffff). Next W_0 is width of texture (in order to get pixel at next texture scanline) and W_1 is W_0 + 1 to get next pixel without unnecessary adding. So we have all our indices, it's enough to get our weighting factors from multab. Now i can see i wrote it bad. I should've switched multab dimensions in order to take advantage of memory caching. Try it yourself and see if it's faster (you have to switch multab dimensions to [4096][4] and also all indirections to it) It will read first value of multab and in same read burst store three next to cache which is far faster than memory - it should be quite well visible speedup.
A reader who pay attention propably found error in this. Where ? In computing texel indices. We can't use index + 1 to get next pixel. In middle of texture, it's allright. But on the right edge we'll get pixel one step right, but also one step bottom! (this problem is for u only, v will compute allright) If you really wanted to do it right, you'd have to:
|
Meaning of W_0 remains the same, we won't need W_1 but it's gonna be a bit slower. Visual error of previous version is only poor visible jump at right border of texture so it's a bit better visible repetitivness of texture, but you really have to search for it, unless texture contain some contrast horizontal lines - then it's quite well visible. I'll use the faster version from now on.
How does it look then ? Nice, definitely !
Bilinear filter
No filter
Example can make screenshot (by pressing F12). Textures are in TGA format which is (i suppose) well known one.
Download it right here:
What about next time ? I guess something about light and lighting techniques. But for now ... bye!
-tHE SWINe-
-tHE SWINe-
Valid HTML 4.01